Tuesday 9 October 2012

Apple and plum shortcake

I’ve fallen back in love with my very first recipe book I bought Cakes and Slices and found this simple shortcake recipe. Something a little different to a cake but still just as tasty. Next time I make it I will work the dough a little more as it turned out quite rough, probably because it was a bit dry! So here goes!

250 g plain flour, sieved
1 tsp baking powder
125 g unsalted butter, cubed
55 g caster sugar, plus extra
1 egg, lightly beaten
1 tbsp milk, plus extra
4 eating apples, peeled, quartered and sliced
Ground cinnamon
3 tbsp plum or damson jam

Heat oven to 180oC.

Rub the chilled butter into the flour and baking powder until it resembles bread crumbs (I used a mini chopper – it takes literally seconds!). Make a well in the middle of the mixture and pour in the beaten egg and milk. Mix together with a table knife until it starts to stick together. If you need too, add a little more milk. Flour a board and gather the dough together. Mould into a ball, cover in cling film and chill for about half an hour. I used this time to prepare the apples. Half the dough and roll one part out into either a rectangle or cirle whichever you prefer until it’s about 20 cm long or in diameter. Place on a baking tray and spread over the jam. Lay the apples on top and sprinkle with sugar and cinnamon (to your taste). Roll out the second half of the dough in the same way and lay carefully over the top of the apples. Brush with milk and sprinkle with more sugar. Bake for 40-45 minutes or until golden brown. Leave to cool and cut into eating sized pieces. Delicious served still warm!


Lizzi :)

Wednesday 26 September 2012

Gingercake

Aaaaa I can smell this cooking while I write this post. I find ginger such a comforting smell; so warm and spicy. I wanted to use fresh ginger in a cake so I bought some and experimented with a recipe from my cake sand slices recipe book. It’s adapted from a gingerbread apricot upside-down cake which I have to say sounds wonderful so I will probably be trying this out soon!

Here is the recipe I used to make an 8 inch round cake:

175 g unsalted butter
125 ml water
90 g golden syrup
165 g soft brown sugar
185 g self raising flour, sieved
About a thumb sized piece of fresh ginger (not very accurate I know but it really is down to personal choice about how gingery you want your cake to be!)
½ tsp nutmeg

Heat the oven to 180oC (or 355oF - I’ve moved again so I’m back to an electric oven but fortunately this one works better than the last one I had!)

Brush an 8 inch (20 cm) round cake tin (I used silicone) with a little oil and dust with flour, shaking out the excess.

Heat the butter, water and syrup in a small saucepan until the butter has melted. Mix the dry ingredients together in a large bowl. Grate in all the ginger (it’s quite hard but stick with it – it’s worth it!). Pour the wet mixture into the flour and sugar mixture and stir well until combined. Spoon the mix into the cake tin and bake in the oven for about 40 minutes until a cocktail stick comes out cleanly from the highest part of the cake. Leave to cool in the tin for about 15 minutes, turn out onto a plate or cake stand and simply dust with icing sugar.

And here are the scrumptious results!


Sorry it's been so long since I last posted...again! Life just seems to get in the way sometimes! Hopefully I'll be a bit more on top of everything from now on :)

Lizzi :)

Monday 16 July 2012

Paluszki

So far I’ve only baked sweet things but I fancied making something polish and came across a recipe for paluszki which are similar to bread sticks but are made with potato. They turned out wonderfully light and buttery and went down a treat with my boyfriend and my family.  Such a simple recipe and they can be decorated with pretty much anything you fancy. I used poppy seeds on one batch and sunflower seeds on the other. The only thing I would change next time would be to add some salt to the dough as I make it. So here they are from one of my Baked and Delicious magazines.

For approximately 50 small paluszki:

175 g cold mashed potato
175 g butter, softened
175 g plain flour
A selection of seeds
1 egg, beaten

Heat oven to 180oC (gas 4 or 360oF).

Rub the butter into the flour (or cheat like me and use a mixer!) until it resembles breadcrumbs. Add the mashed potato and mix together until it forms a sticky dough. Wrap it in cling film and leave to chill in the fridge for at least an hour. Turn out onto a well floured board and kneed for a couple minutes. I found my dough was still quite sticky so I used quite a lot of extra flour. Roll the dough out to about ½ cm thick and cut it into strips 1 cm wide and about 8 cm in length. Lay the strips onto a baking sheet lined with greaseproof paper and brush with the beaten egg. Sprinkle with your chosen seeds and bake for about 15 minutes until golden brown. Leave to cool and then eat!


Lizzi :)

Friday 13 July 2012

60th Birthday Cake

Now, birthday cakes are always about how they look more than how they taste so I went with simple sponge cake for my mum’s. I made a bigger vanilla sponge for the bottom layer and a smaller chocolate sponge for the top layer. I followed the tip for one of my earlier posts: weigh the eggs without the shells and use equal amounts of butter, sugar and flour. I used 4 eggs for the vanilla sponge and 2 eggs for the chocolate sponge. I iced it with vanilla cream cheese buttercream coloured with food colouring paste rather than liquid. It makes a more intense colour. I made little white roses with Mexican paste from a local baking shop – they are quite easy if a little fiddly. I found loads of tutorials on youtube so I won’t post how I made them (unless someone wants me too!). So here is the recipe and the pictures are below and I have to say I am particularly proud of it!

For the vanilla sponge:

4 eggs totalling 205 g, lightly beaten
205 g caster sugar
205 g butter, softened
205 g self raising flour, sieved
1 ½ tsp vanilla extract
2-3 tbsp milk

Heat the oven to 170oC (gas 3 or 340oC)

Beat the butter until it’s very soft. This took me maybe a minute or so. Gradually beat in the sugar and keep going once it’s all added until the mix is very pale and light. This took about 5 minutes. Then add the eggs very, very slowly and beat well in between additions. The mix curdled again but not quite as badly as usual. Fold in the flour in about 4 batches. Finally fold in the extract and milk. Pour into an 8 inch deep cake tin (or silicone mould like me) and bake for about 45 minutes or until cooked. Check with a cocktail stick. Leave to cool in the mould for 15 minutes then turn out onto a cooling rack.

For the chocolate sponge:

2 eggs totally 97 g, lightly beaten
97 g caster sugar
97 g butter, softened
97 g self raising flour, sieved, with 3 tbsp removed and replaced with 3 tbsp cocoa powder
½ tsp vanilla extract
1 tbsp milk

Follow the same method as before. Pour the mix into a slightly smaller 7 inch deep cake tin (or silicone mould like me) and bake for about 25 minutes or until cooked. Check with a cocktail stick. Leave to cool in the mould for 15 minutes then turn out onto a cooling rack.

For the cream cheese buttercream:

200 g butter, softened
100 g full fat cream cheese
1 kg icing sugar, sieved
1 tbsp vanilla extract
2-3 tbsp milk
Food colouring paste (your choice of colour)

Beat the butter and cream cheese together. Add icing sugar in about 8 batches and beat. Half way through add the extract and the colouring. Use the milk to help add the remaining icing sugar. If the colour isn’t right keep adding it and beating the icing well until you get the right shade. Use the icing straight away.

To assemble the cake I used wooden kebab sticks as doweling rods to hold the cakes together. I literally just cut them to size, pushed them into the bottom cake and placed the chocolate cake on top of them. I used a lazy Susan (an icing turntable) to help spread the buttercream all over the cake. It made it so much easier! I used a slim metal spatula to spread and smooth it and the effect is quite nice. Once it was all covered I pushed in the roses all over the cake. I finished it with a diamante six and zero and some feathers from a baking shop.

Here are the results!


Lizzi :)

Left over sponge

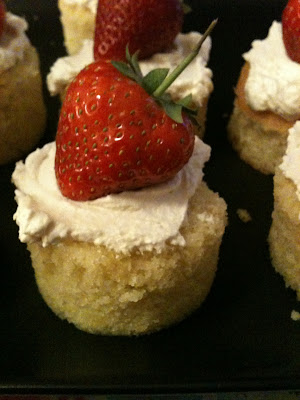
It was my mum’s birthday yesterday so I made her a special cake but before I did I wanted to make sure that I would be able to make a good cake. Originally I was going to make Madeira cake but then settled on a normal sponge recipe. I found a great tip for sponges: weigh the eggs (however many you are going to use) WITHOUT the shells and use equal amounts of butter, sugar and flour. It will work perfectly. I made a sponge but didn’t have anything to do with it so I experimented and made some simple cream and strawberry cakes and some chewy chocolate truffles. I will link the sponge recipe after I write it!

For the strawberry cakes I used a circular cutter to cut the sponge, whipped up some double cream with a bit of sherry (I’m not 70 but it tastes good!), spread it on the cakes and topped with a whole strawberry. Simple but scrumptious.

For the chewy chocolate truffles:

About an ⅛ of a plain vanilla sponge which I guess is approximately 200 g!
100 g fruit and nut chocolate, melted
50 ml cherry brandy (alcoholic theme here!)
100 ml double cream

Put the oven on a low temperature, not more than 100oC, crumble the sponge, put it on a baking tray and dry it out in the oven for about 15 minutes. Be careful not to burn it. Put the crumbs in a bowl, add the chocolate, cream and brandy and mix well. Divide them between mini muffin cases and chill in the fridge. These were completely made from whatever I had in the cupboard but I will definitely be making them again – when I got up in the morning my boyfriend had eaten all of them!!

And here they all are!


Strawberry cakes


Chewy chocolate truffles


Chewy chocolate truffles

Strawberry cakes

I hope you like them!

Lizzi :)

Chocolate orange cupcakes


My sister has just finished her degree and graduated with a first (congratulations!) so I decided to make her some cupcakes. I found a posh orange extract in Sainsbury’s so thought it would make a nice change to make some fruity cupcakes. I cheated and used chocolate fudge icing I bought from the shop but I have to say it’s YUMMY! I took the recipe from my Bake Me I’m Yours……Cupcake book (I have used this recipe in a previous post).

So to make 24 cupcakes:

225 g caster sugar
225 g butter, softened
4 eggs
225 g self raising flour
1 tsp orange extract
1 tub of Betty Crocker chocolate fudge icing
Edible letters (I used Silverspoon white chocolate ones)

Heat oven to 175oC (gas 3 or 350oF)

Beat sugar, butter and flour together. Slowly add eggs and extract (….mine curdled!) and keep beating. Mix until well combined and quite light. The mix is described to be a ‘soft dropping consistency’ when it is ready. It doesn’t take me long to get to this stage. Divide the mix into the cupcake cases and bake for 10-15 minutes depending on your oven. I like using pretty cases and these ones were pink with butterflies on them. Use a cocktail stick to check they are cooked. I always check the biggest cake and the stick should come out clean. Turn out onto a cooling rack and leave for a good hour before icing. I just spread the icing on and then spelt out ‘congratulations’ with the white chocolate letters. For the left over cakes I sprinkled them with sugar stars. And here they are!


I'm sorry that the pictures are on the side but I'm not technical enough to work out how to change it! :(
Lizzi :)

Chocolate and pear cheesecake

I was always under the impression that cheesecake would be hard to make but it’s actually one of the easier things that I bake. I originally made it for my boyfriend the very first Christmas we were together because it’s a popular dessert in Poland at that time of year. This one went down a treat the first time I made it so I thought I’d share it on here! I always feel like chocolate and fruit together make a good summertime treat. This recipe is from the Philadelphia website but I actually used Sainsbury’s cream cheese, chocolate bourbons instead of digestives and double cream instead of sour cream! It worked perfectly though. So here it is!

For an 8 inch in diameter cheesecake (serves about 12 or less if you are hungry!):

175 g bourbons, crushed
40 g butter, melted
400 g full fat cream cheese
140 ml double cream
3 eggs, beaten
100g caster sugar
25 g plain flour
25 g cocoa powder
75 g dark chocolate, melted
2 ripe pears, pealed and cubed

Heat oven to 170oC (gas 3 or 340oC)

Line the bottom of an 8 inch springform cake tin with greaseproof paper (not baking parchment – it’s RUBBISH!) and grease with butter.

Mix the bourbon crumbs and melted butter together and push into the bottom of the cake tin. Beat the cream cheese, cream, sugar and eggs together until light and smooth. Mix in the flour, cocoa powder and melted chocolate. Fold in the pear once completely combined and pour onto the biscuit base. Bake for about an hour (always check at around 45 minutes to see how it is going) until set. Once the cheesecake is cooked, turn off the oven and leave it inside for another hour. After this, take it out of the tin and refrigerate for at least 3 hours although overnight is better. And here is the final product!


Lizzi :)

Wednesday 20 June 2012

Super Duper Chocolate Muffins


Aaaaaa it’s been so long since my last post! I’ve just done my first exam for my degree since starting OU and my first exam in 5 years! So it’s been a bit of a crazy month! Plus loads of extra hours at work with the bank holidays equalled a very tired Lizzi! But my boyfriend has been in Poland and got home yesterday so I decided to make him a welcome home present. I found a lovely recipe for BIG chocolate muffins from another blog here using tulip cases. I got my cases from Lakeland and they were half price – bargain! I followed the recipe exactly and I will most definitely be making them again but with extra chocolate chips mixed in for a bit more decadence! I decorated with cream whipped up with a little icing sugar and vanilla extract and some fresh blueberries on top.

For 12 very big muffins:

225 ml milk
25 ml malt vinegar
165 g butter, softened
300 g caster sugar
3 large eggs
2 tsp vanilla extract
200 g plain flour
70 g self raising flour
70 g cocoa powder
1 tsp bicarbonate of soda
100 g white chocolate

For the decorations:

300 ml double cream
50 g icing sugar
1 tsp vanilla extract
250 g fresh blueberries

Heat oven to 180oC (350oC or gas 4)

Pour milk into a jug and add the vinegar. This seems disgusting but the muffins turned out fine! It will curdle. I believe it’s to make the bicarb work but don’t quote me on that! Beat the butter and sugar together until light and fluffy and then gradually beat in the eggs and vanilla extract. As per usual, mine curdled – no change there! Sieve all the dry ingredients together and then add to the egg mixture. Pour in the vinegary milk. Mix really well. It might take a while because there are a lot of ingredients. Line a normal muffin tin with the tulip cases and fill them to about the top of the tin. It makes exactly 12 muffins. Top with chopped up white chocolate and bake for 35-40 minutes or until cooked through. Leave to cool, beat the cream with the sugar and extract and spread onto the cakes. Top with the blueberries and then eat them! As always I have some pictures. I hope you like them!


Lizzi :)

Friday 18 May 2012

Sour Cream Banana Cupcakes

When I bake, my boyfriend always likes to eat some of the results but as the cupcakes I made earlier are for someone else I had to make him something as well! So he has been blessed with these lovely sour cream banana cupcakes. I didn’t have sour cream so used crème fraiche instead and they are fine! The recipe is from the same book I used for the white chocolate mud cakes called The Complete Book of Cupcakes, Cheesecakes and Cookies by The Australian Women’s Weekly. I made them a bit fancier by taking them out of their cases and filling them with icing and fresh banana.

For 12 standard sized muffins:

90 g butter, softened
110 g brown sugar
2 eggs
75 g plain flour
75 g self raising flour
½ tsp bicarbonate of soda
½ tsp mixed spice
2 mashed medium sized bananas
80 g sour cream
2 tbsp milk

Heat oven to 180oC (350oC or gas 4)

Beat butter, sugar and eggs together until light and fluffy (guess what? It curdled again!). Stir in the flours, bicarbonate of soda and mixed spice and once well mixed add in the bananas, sour cream and milk. Use a spatula to scrape down the sides of the bowl to get all the ingredients well mixed in. Divide the mix between 12 muffin cases and bake for about 20 minutes or until a cocktail stick comes out clean. Once the cupcakes are cooled, slice in half, spread with a little butter cream (my standard recipe is here) or fresh cream, layer on banana and put the top back on. And here are the very tasty results!


Lizzi :)

White Chocolate Mud Cupcakes


I wanted to make some cupcakes for a lady I know who has just found out she is a having a baby girl so decided that white chocolate mud cakes would be perfect. I’ve made these before and actually took them to Poland the first time I met my boyfriend’s parents! I used a simple vanilla buttercream, some sparkles and little pink feet to decorate them. The recipe is from a book I got from my best friend one Christmas called The Complete Book of Cupcakes, Cheesecakes and Cookies by The Australian Women’s Weekly. Unfortunately I can’t find it on the internet anywhere but there are lots of similar ones. I love the cupcake recipes as they are quite unusual.

For 12 standard sized muffins:

125 g butter, softened
100 g white chocolate
150 g brown sugar
90 g golden syrup
160 ml milk
150 g plain flour, sieved
50 g self raising flour, sieved
1 egg

Heat oven to 170oC (325oC or gas 3)

Melt the butter, chocolate, sugar, golden syrup and milk in a saucepan over a low heat. Once all combined pour the mixture into a bowl to cool for about 15 minutes. Whisk in first the two flours and then the egg. Divide the mixture between 12 muffin cases. It is quite a sloppy mix so I first poured it into a jug and then poured it into the cases. Bake for about 30 minutes or until a cocktail stick comes out cleanly. I decorated these cakes with vanilla buttercream (my normal recipe – one from here), edible pink glitter and pink feet! Which I did buy from my local cake decorating shop – cheating? Maybe! And here are the results!


Lizzi :)

Tuesday 15 May 2012

Soft Chocolate Cookies

 
I was looking through my bookmarked pages this morning (I have A LOT) and came across these cookies on a website I was browsing a couple of months ago. I have a whole tin of treacle in my cupboard which I have used once to make gingerbread at Christmas so I thought I’d give these cookies a go. The recipe on the website is American so although the ingredients look completely different they aren’t! I have again converted it into grams as I find it easier to do although I do have some fantastic Russian dolls that measure cups that I got from my mum! It is slightly different as I’ve left out the chocolate chips – purely because I didn’t have any. I guess the cornflour is used to make them light but to be honest if I made them again I would probably just replace it with more plain flour. These ones have come out feeling a bit powdery when you eat them. At the moment we don’t have a microwave so I softened my butter in a bain marie. I always, always use greaseproof paper not baking parchment as everything sticks to parchment. So here is my slightly adapted recipe.

For about 30 good sized cookies.

240 g (1 cup) butter, softened
180 g (1 cup) caster sugar
2 tbsp treacle
80 g (⅔ cup) corn flour, sieved
3 tbsp cocoa powder, sieved
2 eggs, beaten
300 g (2 ½ cups) plain flour, sieved
1 tsp bicarbonate of soda

Heat oven to 180oC (350oF or gas 4)

Beat softened butter, sugar and treacle together until they are light and resemble whipped cream. Beat in corn flour and cocoa powder until completely combined. Use a spatula to scrape around the bowl to get all the ingredients. I used a big bowl because there are a lot of ingredients. You could halve the mixture if you didn’t want so many cookies. Pour in all the eggs and beat into the mixture. Mine curdled – AGAIN! But it turned out fine so I think I just need to resign myself to the fact that my eggs don’t like me! Mix in the flour and bicarbonate of soda in about 3 parts to make it easier. You should end up with a mixture a little like cake mixture but stiffer. I lined baking trays with greaseproof paper and dropped little rounds of the mixture onto them using a dessert spoon and teaspoon to push it off. You can make them as big or as little as you like, just remember to alter your cooking times for whatever size you make. Cook for about 12-15 minutes or until they are slightly browned on the outside. Leave to cool on the trays for a while and then turn onto cooking racks.

And here are the results!


Lizzi :)

Wednesday 9 May 2012

Victoria Sponge Cake

Ok, so it’s been nearly a month since I last posted and in that time we have moved house! The reason it’s taken me sooooo long to finally get to bake is the oven we now have is gas and wasn’t on our safety certificate. I’m a bit funny about gas and always have a minor panic attack when I smell it! But it is sorted now and I’m so excited to have a gas oven because they are quick and tend to be easier to bake with. I need to get the hang of using it because its my mums 60th in July and I’ve been informed by her that I am making her cake so of course it will have to be my best yet! Again I’m following the simple theme and I’ll gradually work my way onto the more complicated cakes I’ve made. So here is a very English, very traditional and very tasty Victoria sponge.

This recipe is from one of my earlier Baked and Delicious magazines.

For one Victoria sponge cake:

175 g (6 oz) unsalted butter, softened
175 g (6 oz) caster sugar
175 g (6 oz) self raising flour, sieved
3 medium eggs, beaten
1 tsp vanilla extract
2 tbsp milk

Heat oven to 180oC (350oF or gas 4 for me now!)

Beat butter and sugar together until light and fluffy. Add the eggs a little at a time and keep beating until completely incorporated. Mine did curdle again but turned out fine. Fold in flour in about three separate batches. Finally add the milk and vanilla extract. Split the mixture between two 7” (18 cm) sponge tins (I used my silicone ones) and bake for 20 – 25 minutes until a cocktail stick in the middle comes out clean. Mine were in for closer to 25 minutes. Cool in the tins for at least 10 minutes but longer if possible. Turn out onto a cooling rack and leave to cool completely before sandwiching together.

If I were making this for afternoon tea in the summer I’d use cream and fresh strawberries as the filling but as the weather is so atrocious at the moment I used buttercream and strawberry jam. I made the buttercream the same as I always do: by guessing! I used about 100 g butter and ½ tsp vanilla extract and beat in about 250 g icing sugar. I spread the buttercream on the bottom cake and the jam on the top cake and sandwiched them together. I dusted with a little caster sugar and here is the result!


I'm quite happy to answer any questions so feel free to ask!

Lizzi :)

Thursday 12 April 2012

Filled Fairy Cakes

I have the baking bug! It really chills me out and work is crazy at the moment so my boyfriend is going to get fat! Today I decided to try and make some filled fairy cakes but went with the easy option and filled them after I’d cooked them. I topped them with a simple icing made from butter, cream cheese and icing sugar. My fairy cake recipe was taken from my first ever Baked and Delicious magazine (Baked and Delicious) and is a basic sponge recipe which I adapted for the second batch of mint chocolate flavour.

For approximately 8 fairy cakes:

60 g (2 oz) softened butter
60 g (2 oz) caster sugar
1 egg
60 g (2 oz) self raising flour (I took out 1 tbsp and replaced with 1 tbsp of cocoa powder in the second batch)
1 tbsp milk
½ tsp vanilla extract (I substituted this for peppermint essence in the second batch)

Heat oven to 190oC (375oF)

Beat butter and sugar together. Gradually add a little of the egg whilst still beating to prevent the mixture from curdling. Generally if my mix does curdle it doesn’t affect the outcome but I do get a satisfaction from preventing it! Add a little of the flour if it does. Fold in the remaining flour, extract and milk with a metal spoon. Divide evenly into cake cases and bake for 10-15 minutes. I always check mine are cooked by using a cocktail stick and checking that it comes out clean. Leave to cool on a wire rack.

I made fruity fairy cakes with the basic vanilla mix by taking out a little of the middle of the fairy cakes. I used the end of a teaspoon to make a small hole and filled with Morrison’s Best Mango and Passion fruit jam. I mixed the jam up a bit to make it easier to use.

For the mint chocolate cupcakes I made a very basic ganache with some left over sour cream from the doughnuts I made earlier in the week! I just melted 50 g milk chocolate and beat in 1 ½ tbsp of the sour cream. Again I made some small holes in the top of the chocolate fairy cakes and filled with the ganache.

For the icing I used 25 g cream cheese, 25 g butter and about 200 g icing sugar with ½ tsp of lemon essence for one lot and ½ tsp peppermint essence for the other. I piped the lemon icing onto the fruity cakes and spooned the peppermint icing onto the mint chocolate cakes. For each batch I finished off with some pretty sprinkles on the top.

And now for the results!


My fairy cakes are coming out a little misshaped at the moment, my bun tin is really shallow so I think I'm going to get a new one!

Lizzi :)